Browning T-Bolt Review and Trigger Tuning
Quite a few years ago I had the opportunity to work with a Ruger 77/22 that a friend loaned me. He was just getting into the sport of .22-caliber silhouette shooting and had purchased it for this purpose. I was immediately impressed with the overall feel of the rifle and its accuracy was very good. Since there were few truly adult sized .22s available at the time, I filed away the thought that someday I would have to add one to my collection. Time went by without me acting upon this idea and it sort of got buried in the back corners of my mind. With the renewed interest my wife recently showed about shooting and her wish to claim one of my existing .22 rifles as her own coupled with my rediscovering the fun of just plain plinking, that old idea popped back to the forefront and I decided it was time to act.
My criteria for what I wanted started as pretty simple; the new rifle had to be .22 LR, substantial enough to feel like it had been made for an adult, be a bolt action and have a reputation for being accurate. I have nothing in particular against semi-autos, but I already have two and the two bolt-action .22s I have (a 1940s vintage Remington 510 that I refuse to tap for a scope mount and a Daisy 2202 that is designed with an extending butt-stock to accommodate kids or adults) are too light and don’t really fit my frame.
Naturally the first rifle that crossed my mind was that Ruger 77/22 of years ago, especially since I have always been a big fan of pretty much any Ruger product. Doing an extensive search of the internet was discouraging. Opinion was sharply, and often bitterly, divided as to the accuracy of this rifle. Even looking at the blogs and forums predominantly populated by diehard Ruger fans like me revealed that my friend’s rifle wasn’t necessarily the norm. Now there are always spoilers on any forum that delight in telling tales to dash the hopes of other posters, but the story was too consistent from forum to forum and from a multitude of posters to ignore. The stories ran the gamut from excellent accuracy to abysmal. Not willing to take chances or spend a fortune in tuning gadgets and/or match barrels, the idea of the Ruger was laid to rest.
One rifle that kept popping up on all of the forums as an alternative to the Ruger was the CZ 455. There was a great deal of support and very little negative chatter on this rifle. Accuracy seems to be considered exceptional in the majority of cases and there were very few people complaining about anything other than the trigger, and even that could be cured with an $18 kit if necessary. A big plus to the budget-minded is the fact that the 455 sells for roughly half what a Ruger costs. The Varmint version drew my eye and I was just about ready to make the plunge and order one when a random comment from one of my employees set me thinking about a rifle that I hadn’t even thought about for years, let alone considered; the Browning T-Bolt. More research on the internet found high praise for accuracy with the only complaint being the trigger which, though adjustable, will only go as low as around 3.5 pounds. Figuring that I might still better that, I decided to make a call to my friendly gun shop and have one ordered. These are good people and only charged me their cost and a few bucks for their trouble. Added to the fact that Browning was having a promotional event that month where they refunded sales tax up to 8% of the purchase price, it was a winning proposition.
The T-Bolt I bought is of the Target/Varmint configuration. This means that the barrel, at 22” in length, is of a somewhat heavier contour than the sporter version. Not a lot; just a bit more than a medium contour, but enough to add just a little more weight out front. The muzzle is cut to a recessed flat target crown with no hint of burrs. All metal work is finished in an attractive blue and well polished. The chamber is advertised as being “semi-match”…more on this later. There are no sights and the receiver is tapped for scope mounts, but neither mounts nor rings come with the rifle. Mounts were ordered when I placed the order for the rifle. The safety is of the familiar sliding, tang-mounted variety and is very positive while being easy to use.
The bolt body is finished bright with the rear and the bolt handle polished and blued. The bolt face is equipped with a fairly typical claw-type extractor that offers dependable and positive extraction of fired cases. Action of the bolt is directly rearward and forward. When in the forward position substantial twin locking lugs protrude into matching holes in the receiver body behind the ejection port for an incredibly strong lock up. Drawing the spring-loaded bolt handle to the rear activates twin toggles that draw the lugs into the bolt body to allow movement. Removing and re-installing the bolt can a bit tricky, but once you have struggled through it once or twice it all becomes clear, easy and logical. All bolt travel is in a linear manner with nothing rotating. It is relatively logical for one to make the conjecture that the lack of turning or camming coupled with minimal tolerances might well contribute to accuracy.
Browning changed from the original 5-round magazine to a newly designed 10-round one that protrudes very slightly below the stock line when inserted. It is similar to a Ruger magazine but much sleeker designed. The company calls it a “double helix” design that is rotary in function but when seen from the front or back gives the impression of a figure “8”. To facilitate loading rounds, a thumb-operated notched wheel rotates the magazine follower to help take spring pressure off of the follower for each cartridge and eliminates the “sore thumb” syndrome often associated with filling magazines and running a thumb over sharp lip edges. Loading is quick and easy once you get the hang of it and ejection of the magazine from the action is positive – almost too positive! If you don’t keep the palm of your hand under the magazine when ejecting it you will be picking it up from the floor. Function to date has been flawless and the bolt gets increasingly smoother as it wears into intimate contact with the receiver.
The stock is of dense, straight-grained, walnut in a Monte Carlo design which is ideal for scope use. With a forearm that widens into a semi-beavertail toward the front, it is both easy to grasp and sandbag friendly. A plastic butt plate is fitted to the rear and all action and barrel channel inletting is clean and precise. The receiver is glass bedded in key areas and the barrel channel is cut to free-float the barrel, but not to an extent that it appears “hogged” out. Sling swivel studs are installed. The checkering is utilitarian but attractive, clean and effective. The overall finish is a satin finish that approximates oil. The whole thing is a package that weighs in at a nominal 5.5 pounds (without scope), only about a pound more than the sporter version, and balances very nicely with a very slight muzzle-heavy feel that makes the barrel hang in a natural balance when shouldered, just as I had hoped.
When I got the rifle home I thoroughly cleaned all traces of packing/shipping oil from the surfaces and bore, installed the scope mounts and adjusted the trigger to as low a setting as possible. On this rifle, that figured to be just at 3.5 pounds. I had picked up a Weaver Kaspa 4-16 scope with the side-mounted parallax adjustment (Yes, I know, WAY too much scope for a .22, but what the heck.) and sorted through my drawers of rings to find a set that gave enough clearance to the objective that I can install Butler Creek flip-up covers later. Bore sighting the scope; I was ready to make some noise.
Naturally the day was windy, averaging 18 mph and gusts up to 30 or so, but I wasn’t about to wait for a perfect day. Setting up my bench in my garage to keep me out of as much wind as possible gave me a clear shot of 35 yards to my backstop. Grabbing a box of Remington bulk ammo and stapling up a target, I was ready to shoot.
Nestling the rifle into the sand bags, I aligned the crosshairs on my target and squeezed off a round. Of course the resulting bullet hole wasn’t where the crosshairs were centered, but at least it was on the target. I learned a long time ago not to just chase bullet holes when sighting a scope, so trying to judge the wind gusts, I proceeded to fire four more rounds. As I watched each round appear to go into the same hole, I started to get a little excited and failed to catch a break on the wind for the final round. Bottom line is that the first four shots measured .225” on centers with the fifth round opening the group to .32”. Subsequent shots while fine-tuning the scope and trying to read the wind averaged little more than the first group.
As to the “semi-match” chamber; match chambers are usually cut so that the bullet nose is jammed firmly into the rifling for better alignment and supposedly accuracy. When chambering the Remington rounds and then extracting them in my T-Bolt, the bullet noses showed a hint of rifling marks. Different brands may engrave more or less depending on actual configuration, but if that is a help for accuracy, I’m all for it.
The Weaver scope was actually a disappointment. Parallax could not be eliminated at yardages less than 35 yards. While well suited for a centerfire, for a .22 I couldn’t accept that limitation. I replaced the Weaver with a Hawke 3X9 Rimfire scope with mil-dot reticles and sighted it in. This scope quickly proved to adjust parallax free as close as 10 feet out to infinity…much more flexible for .22 uses. Also interesting, Hawke offers a free app for smart-phones that allows you to input actual velocity, ballistic coefficient and zero-range to compute the correct mil-dot to use for various yardages. This includes down-range ballistics and even uses your phone’s camera to measure for incline! The app even has pre-sets for pellet rifles using various pellet configurations! There are several other features as well and it can be used for any cartridge and scope reticle that Hawke manufactures. All inputs can be stored for quick reference.
Later shooting of 10-shot groups with a more varied assortment of ammo at 50 yards proved that the T-Bolt isn’t overly sensitive to ammunition brands or types. I tried Winchester sub-sonics (.74”), Winchester T-22s (.52”), Remington Stinger (.77”), Remington “Golden” bulk-pack (.54”), Winchester WildCats (.70”), Federal Lightnings (.72”) and, the real surprise, Federal Champion (bulk pack) at .47” (all groups measured on centers)! In most cases the cartridges whose bullets engraved into the lands the farthest proved to be the most accurate. Granted, this is a very small sampling but does indicate a probable trend.
All of the above groups can probably be tightened a little if I can get that trigger lighter! Though crisp and clean, the trigger refuses to adjust any lower than 3.5 pounds and takes extreme concentration to keep the crosshairs aligned while applying that much pressure. Since even my hunting rifles have triggers of 2.5 pounds or less, with my varminters running much less, this is somewhat disconcerting. That 3.5 pounds is as the company advertises so I can’t complain too much about it, but that much trigger weight on a target or varmint rifle is simply excessive. Making matters worse, the trigger is encased in a plastic shell that precludes getting to the working parts without breaking the protective seal and negating your warranty. Conducting another search of the internet revealed that there are no aftermarket triggers, but there is a post detailing how the springs can be adjusted for a lighter pull…if you don’t mind experimentation and voiding warranties. I feel strongly enough about the situation that I will be digging into those parts to see what I can do. Even a reduction to 2 pounds would be an improvement as long as the trigger pull remains crisp and clean.
Even with the above, I am very happy with my T-Bolt. It just feels right in my hands and at my shoulder, doesn’t appear to require premium ammunition to perform extremely well and looks great besides. Yes, the CZ 455 would have been cheaper and might have shot as well, but that interesting bolt arraignment really hooked me. The rest is just a bonus!
This is intended for the newer model Browning T Bolt with the helical magazine. Be warned that any of the following actions will void Browning’s warranty. Though this has proved safe in my rifle, I take no responsibility for accidents or damage that may occur due to anyone performing this action. As with anything involving firearms, make sure the firearm is unloaded prior to undertaking any work. It is the responsibility of the owner to make every effort to ensure that the firearm is safe before using it after modifications.
Making sure that the rifle is unloaded, remove the action from the stock being careful not to lose the screws. Relieve tension on the trigger adjustment screw pictured below.

Loosen the trigger assembly retaining screw entirely using the same Allen wrench used to remove the receiver from the stock. Lifting slightly on the rear of the assembly, slide entire assembly forward and off of the rifle. Don’t worry, there aren’t any springs and/or parts that will drop out.

Lay the trigger assembly on its left side and identify the three locking tabs shown in picture below located on the left side of the housing. Keeping outward pressure on the sides of the unit push the taps into the unlocked position. Once the two parts begin to separate, use a flat-blade screwdriver to gently pry the two sides apart with the assembly laying on its right side (left side up). Again, there are no parts likely to drop or fly out a long as you use care.

Examine the relationship of the various parts, especially where the trigger spring (B) rests on the trigger housing ledge (A). This is important for reassembly.
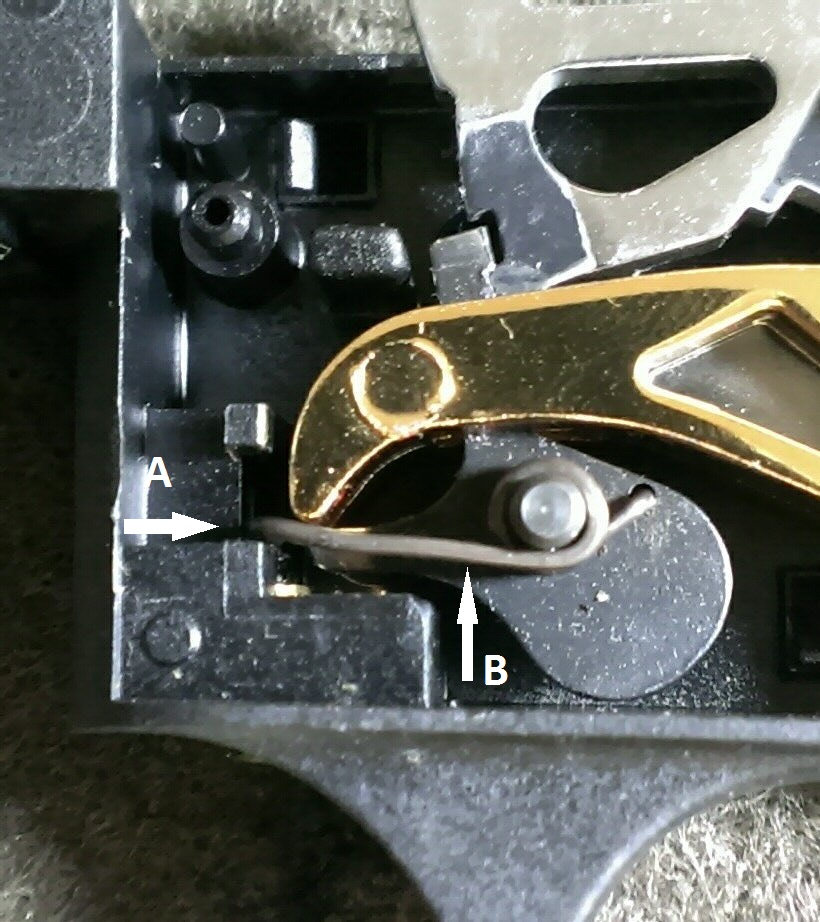
Remove the trigger spring. This just lifts off the pin. If the pin comes along with the spring don’t panic. Just reinsert the pin making sure that it also is pushed into the retaining hole in the housing behind the sear. Supporting the spring by the coils, bend the spring arm (A) upwards (B) perhaps 1/6 of an inch. Keep the bend as close to the coil as possible so that the arm itself remains straight.

Reassemble the spring into the housing making sure that the short leg is properly seated into the hole in the sear assembly and the long leg is resting on the shelf mentioned earlier. Snap the housing cover back into place and reassemble trigger unit to the receiver. This works best with the bolt pulled back out of the “locked” position. Once everything is back together, test the trigger pull. If still too heavy, repeat the above until the trigger is a bit too light. Now use the trigger adjustment screw to apply tension a little at a time until you are satisfied.
It is possible that your adjustments might enable the bolt to be removed (or fall out) with the safety on and the bolt open. If this is important to you, adjust the trigger adjustment screw inwards to increase tension on the trigger spring. Continue a little at a time until the bolt fails to fall out. This will probably increase the trigger pull somewhat but is the price paid for this arrangement. When satisfied, finish the reassembly of the receiver to the stock.
I’m not going to go unto the details of polishing or stoning surfaces and etc. That is too critical and far too easy to get wrong considering the importance of various angle relationships. I was able to get my trigger down to one pound and 14 ounces with a full polish and spring adjustment and resulted in 10-shot 50-yard groups under .5" using Federal Champion ammunition. Only adjusting the spring dropped it from 3.5 pounds to 2.0 pounds. The advantage to bending the spring is that it makes that trigger adjustment screw actually do its job. Screw it in and it increases trigger weight. Back it out and it lessens weight. It allows much finer tuning than the factory set.
When I do any action work I never load the firearm until it endures five or six vigorous blows from various angles administered with a four pound rubber mallet. If everything stays engaged, it’s good to go to the range for further testing.
Be safe,
SSL
Be safe,
SSL
6 comments:
Hi and thanks for your detailed post.This is a tricky subject my gunsmith has tried other browning t bolts to reduce trigger tension and said does not want anything to do with this. I am keen to do what you have but run into a wall when sliding the three plastic locking clips simultaneously (I tried wedging them with small screwdriver to hold open)I could not even get a start to separating trigger mechanism . From pictures I assume the bolt stays in during process. Also would the spring break or weaken a lot from moving it. Thanks Robert rirvine200@yahoo.com Australia.
Thank you guy, this trigger is a shame for browning.
Could you make a video?
Thierry from France
Awesome Job Mate I've Done Same.. Basically De Tension The Spring A Tad, And Then Use The Tension Screw, to adjust the trigger up... Simple Stuff 4 Those Who Know.. Thank You
Good job! I used toothpicks to hold snaps open and tooth picks to wedge apart,NO METEL SCREWDRIVERS! the Warning tag peeled off easy,Had a look around, fully disassembled, the four steel pins come out of the one side if use a twisting motion.
bent the spring almost x2 the amount orig post advised.Yeah, its cheap for a 600.00 rifle but once yoou understand the mechanics of the Tbolt trigger system its not too too bad.Note, you do not have to put the side cover on to test, go ahead and install trigger group on receiver, and ONLY AFTER you are satisfied with the trigger, snap the side cover back on. I got mine to 12 ounces but set it back to 2lbs 1 oz for Hunter Silhouette spec.
Hi and thanks for your detailed post. I had to bend the spring 3 times to get it down to 2.5 lbs
THANK YOU...I've just purchased my Browning T-Bolt and honestly I was concerned on how to go about trigger pull but your complete post has been such a reaffirming assistance, I've been a CZ nut for a while but like you I was instantly drawn to the 'strange' bolt action and I know Browning has a good reputation as a gun maker I thought i will give it a go! Totally satisfied
Johannesburg, South Africa (yes we have swapped our spears for rifles, putting food on the table much easier now ;)
Post a Comment